Getting Started with Image Processing in Matlab
November 14, 2013
Getting Started with Image Processing in Matlab
A digital image is composed of pixels. Pixels can be understood as small dots on the screen, by which the image is composed of. If there are m pixels in the vertical direction and n pixels in the horizontal direction, then we say that the image is of size m-by-n. When we read an image in Matlab, we get the information of these pixels in matrix form. So the image can be though as a matrix of pixels.
Types of Images
Most of the images can be divided into 3 broad categories:
- Color Images
- Gray scale Images
- Black & white (Binary) Images
For a detailed discussion of various types of images, you may please refer to my previous post: Image processing: Types of images.
Image handling with Matlab
For almost all image processing tasks, the first step would be ofcourse to read the image. Then we may view it. Next, we would process the image, which include transformations or manipulations of the image (for example, rotation, zooming, filtering etc…). Then we may view the results of the processing, and finally if we are satisfied, save the processed image.
The following table gives an overview of the commands for all these.
|
Function
|
Command/Syntax
|
Comments
|
|
Read an Image
|
var_name = imread(‘path/filename’)
|
Reads the image and stores it as a matrix in var_name. Matlab supports most of the image formats, including .bmp, .jpg, .tif etc.
|
|
Display an Image
|
imshow(var_name)
|
Diplays the image in a figure window. You can also use imview(var_name), which has some different options
|
|
Processing the image
|
Use any suitable matlab commands
|
|
|
Save an image
|
imsave(var_name,’filename’)
|
The matrix var_name will be stored as an image in your PC with the name given in ‘filename’.
|
Lets do a small hands-on:
Our aim is to read an image, flip it and save it. Open Matlab. Type the following commands in the command window:
>> img = imread(‘cameraman.tif’);
This will read the image cameraman.tif and will store the pixel details in the matrix img. Note that the image cameraman is by default in the Matlab path. That is why we have omitted the path. If you have an image ‘example.jpg’ in the path ‘C:\image’, you would have issued the command as: img = imread(‘C:\image\example.jpg’);
Now, type
>> size(img)ans =256 256
Matlab displays the answer as 256 256. This means there are 256 rows and 256 colomns in our image. That is, our image has a dimention of 256 x 256. Also, this is a 2D matrix, indicating that the image is not a color image.
Lets try to display the image. For that, type the following command at the prompt:
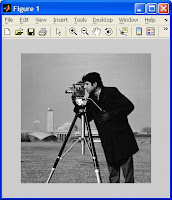
>> imshow(img);
Matlab should display your image in a window as shown in figure.

Now lets flip the image.To flip a matrix left to right, we can use the command fliplr(). Now our image is nothing but a matrix named img, we can easily flip it.
>> img1 = fliplr(img); %Flip the image
>> imshow(img1); %Display the image
You should get an image like this:
Now lets save the image. Note that our flipped image is in the variable img1.
>> imsave(img1, ‘new.jpg’); %Save the image
The flipped image will be saved as new.jpg.
Blog copied from my own blog : http://dspforyou.blogspot.in/